Burp Suite is, as far as I’m concerned, the de facto tool for Web Application Assessments. It’s simple to use and takes little time to get the hang of, but to make sure you’re making the most out of your toolset, I thought I’d post a quick introduction to run through the main tabs and features.
Burp Suite is a man-in-the-middle proxy which can intercept HTTP/HTTPS data from web browsers and mobile applications and allow you to read, modify, and repeat requests to servers. It can detect and monitor WebSockets. It’s ideal for testing for a range of security issues within applications. It can automate many of the tasks required for an effective penetration test and it’s even extensible!
Installation – Configuration
Burp Suite is written in Java and so there’s no specific installation or configuration for Burp itself, if you have JRE installed then it’s likely that you can just go ahead and double click the .jar file and it’ll run just fine. If you’re a Linux user on a distribution that comes with OpenJDK you should find that it runs just fine – however here’s some notes on Oracle Java and using that.
Even though you can execute the .jar directly, it’s often recommended to supply a little more memory to Burp using the following command:
java -jar -Xmx1024m burpsuite.jar
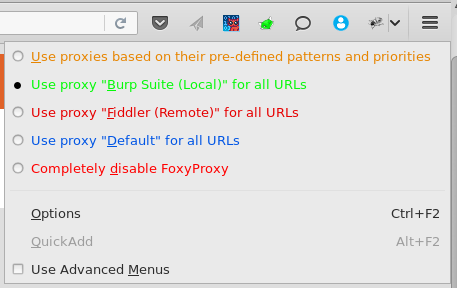
Once Burp is up and running you’ll need to configure your browser to use burp as its proxy. This is no different to setting up a normal proxy in your browser of choice, but I recommend using Firefox and the FoxyProxy add-on. This adds a button into your browser that allows you to quickly swap between having your browser run through burp or directly to the target application.
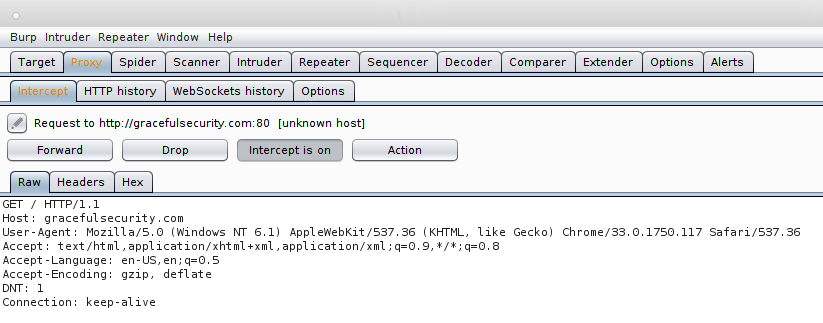
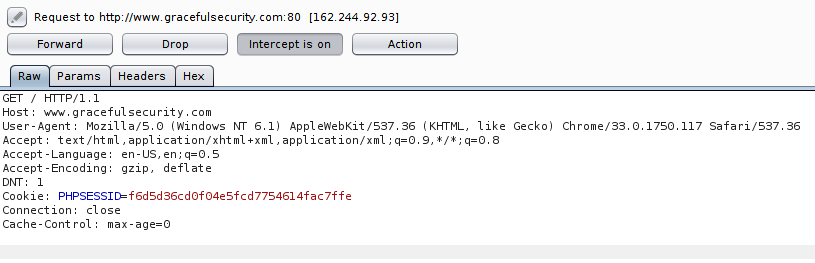
Once you’ve got everything set up burp will automatically be set to intercept all requests from your browser. So if you try to view a page, you’ll get a flashing intercept tab and your raw request will be displayed. This is means you’re all set and good to go!
Intercept is enabled on start-up by default and allows you to make changes to requests in-line as requests are sent to the server or responses are sent back to the browser. You can configure what is and isn’t captured by Intercept through the Options tab which allows you to specify things like intercepted file types, for example.
One thing you’re going to run into quite quickly is the fact that your browser will “complain” about the SSL certificate whenever you view a HTTPS site, you can often click-through these errors but a much better thing to do is to install the Burp CA certificate into your browser as a trusted CA. I test from Firefox but the steps are essentially the same for any browser. First of all download the CA certificate from Burp by visiting http://burp/cert
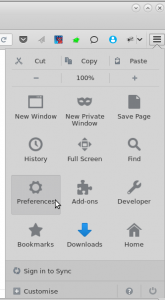
Once you’ve got the certificate open Firefox’s preferences:
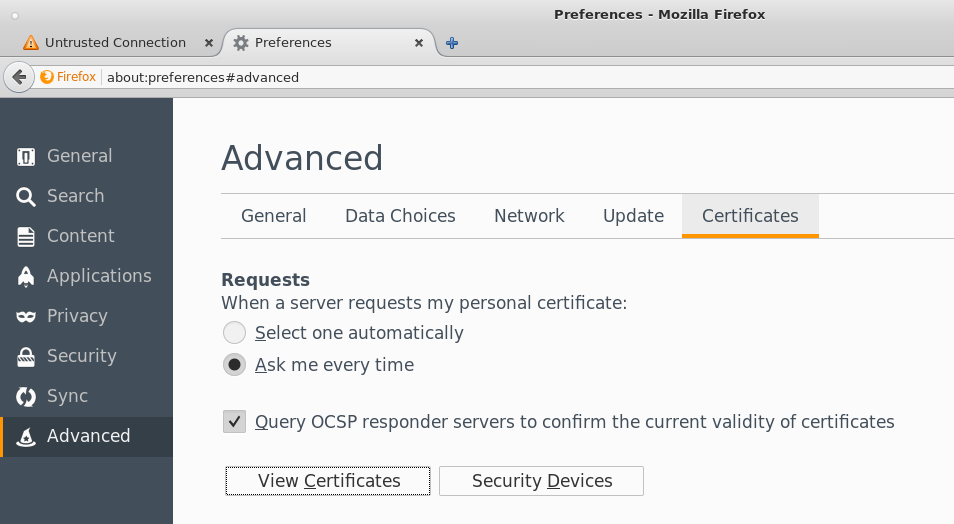
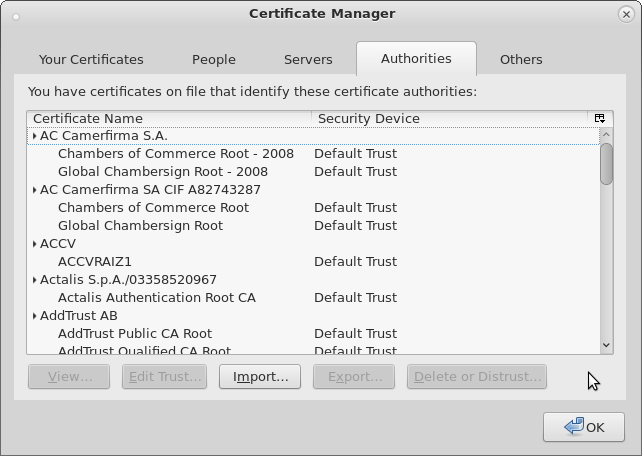
In preferences you want to hit “Advanced” and then “Certificates” and finally “View Certificates”:
That’ll give you this menu where you need to select “Import”:
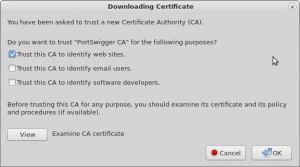
Browse to where you downloaded the file from http://burp/cert and hit open, you’ll then be given this menu and you’ll need to hit at least “Trust this CA to identify web sites”, then okay:
Hit okay and you’re done! Firefox is now configured to trust any certificate signed with your Burp CA certificate, so the nasty SSL complaints will vanish and you can get on with playing with Burp Suite!
Target and Scope – ‘The Dashboard’
Before we get into messing with request and testing applications I’m going to run through all of the tabs in this article and overview each one, if a specific article is worth further information I’ll break out into a separate post to keep things here nice and neat. First of all though, take a look at the Scope option of the Target tab. It’s a good idea to set this up first so that you can reduce all of the information Burp feeds you on the other tab just down to the application that you’re testing.
When you define an application in scope it allows you to filter by that application, although this menu accepts Regex there’s little difference between the neat looking gracefulsecurity.com and the technically accurate gracefulsecurity.com. If you’re not comfortable with Regex you can just go ahead and paste in your application URLs without worrying about the regex options and things should work as you’d expected. Here’s my set up:
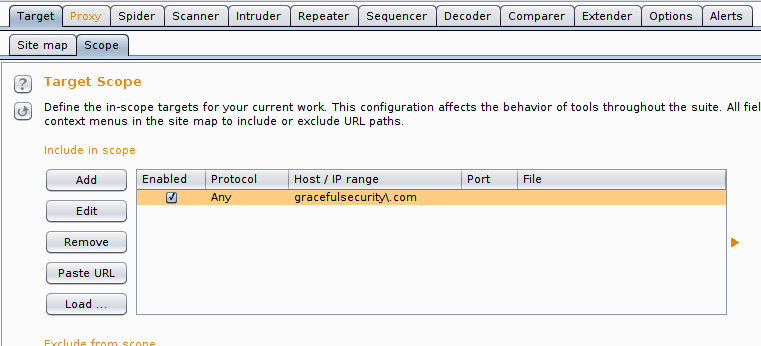
Specifying a scope allows you to alter the way that other tabs, such as Intercept, work but also allows you to clean up the sitemap to show only the applications that you are assessing – keeping your working environment nice and neat!
So now when I take a look at the other tabs and options, such as Target – Site Map, I can reduce the output just to my desired application. As you can see in the following screenshot I’ve used the Filter Option (found by clicking the banner just below “Site Map | Scope” and chosen “Hide out of scope items”, leaving me with this:
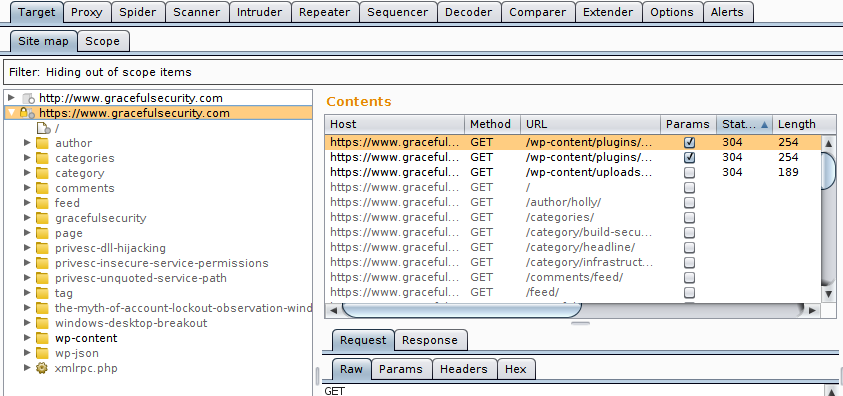
The site map keeps a track of all resources that have been detected, generally if a filter is not applied, any requests in grey-text have been seen but not sent (i.e. an example request exists but has not been sent so no response has been captured for it) and anything in black text has a request and response stored. You can filter by things such as “Parametrized Requests” which is good for finding all of the points to fuzz, but remember Burp doesn’t highlight ReSTful URL parameters within this option. You can also filter out things such as JavaScript files, images and CSS files!
Intercept, Repeat, Intrude – The tools
Once you have your browser configured to pass through Burp suite you can capture, modify and replay messages to allow you to flex and test the functionality of an application. When it comes to manual testing there are three main tools that bring in the fundamental functionality of Burp and you can quickly send requests between all three simply by right clicking a request in any window and selecting the appropriate “Send to” option.
The first of all is Interceptor, this is the function that allows your to interact with an application and then pause the communications between the browser and server and make individual changes to messages as they pass through. With intercept enabled, if you click a link in your browser Burp will gain focus, present the message to you and allow you to either forward, modify or drop the message. You can also do the same with responses from the server. This function looks like this:
Intercept is great to see the raw requests and responses and for making individual small changes to a request/response. However if you want to make repeated manual changes then swap over to Repeater and if you want to make multiple automated changes then Intruder is the tool for that!
Interceptor is great for quick individual changes to an application, or for viewing and modifying the source code returned from a server using the “show response to this request” option. It’s simple to use and allows you to message around with an application during normal interaction, but it doesn’t offer a lot in the way of automation, and to allow you to send multiple payloads to the same function you’d need to constantly swap back and forth between your browser and burp.
If you’re wanting to manually test a specific function a much better tool would be repeater. This one offers a side-by-side view of the response and request, allowing for faster changes to payloads – great if you’re trying to manually exploit a vulnerability like SQL injection or alternatively you’re trying to get just the right payload to evade a filter.
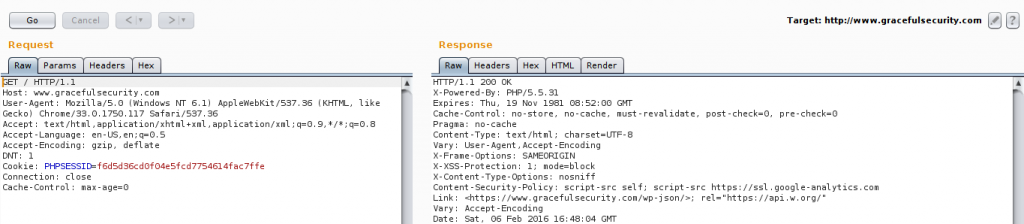
Repeater puts the request and response side by side, if you’re working on two monitors you can always drag the window a little winder and have the request on one monitor and the response on the other. It’s a good tool for multiple manual changes such as fuzzing an input filter or writing up a payload for vulnerabilities like SQL injection.
If you’re using repeater to type payloads into the URI then remember that there’s an option to get it to automatically URI encode payloads for you, which is definitely convenient when you’re just starting out and having quite committed all of the characters to memory.
Although repeater is essentially intercept set to rapid-fire, it’s still very manual and doesn’t offer automation, the trick here then is to use Intruder. With intruder you can select a single, or multiple, items in a request to automatically replace with a list of options. The list can be a simple text file with some payloads, they can be automatically generated (for example numbers 1 to 1000, or all even numbers below 100), or they can be selected from a predefined list (such as common usernames and passwords). This option is great to automate non-complex tasks (if they’re complex then skip on to Macros and Extensions!) such as bruteforcing a login page. In this scenario you’d capture a login request, send the request to Intruder, select the value section of the username and password field and then supply burp with two lists of payloads.
You’ll need to note however that Intruder has four “modes”: Sniper, Pitchfork, Battering Ram and Cluster Bomb. Their use is obvious so I won’t go into detail here. Kidding of course, their use isn’t immediately obvious, but they’re not difficult:
Sniper – takes a single payload set and places each entry of that set into the marked position, so it’s good for fuzzing a function as you can supply a selection of payloads and then burp will neatly present you with all of the responses side by side.
Battering Ram – is very similar to sniper however it can place the same payload in multiple positions, for example if you have a username which must be present in both the post request and the cookie you can select one payload set and this will position it in all positions.
Pitchfork – is a little more complex, but just a touch. You can select multiple payload sets (up to 20) and pitchfork will iterate through each set in turn, so the first request contains the first payload from each set and the second request contains the second payload from each set. It’s great if you’ve got a set of payloads which are different but related, so instead of a username having to be in both the post request and the cookie, imagine a username must be in the post and a related userID must be in the cookie – Pitchfork can help with this one.
Cluster Bomb – is best remembered as the one used for bruteforcing passwords. You can select multiple payload sets and it will iterate through by sending all combinations of all sets. So it’ll take the first payload and try that with each payload of the second set before moving onto the second payload and trying that with each payload of the second set. So effectively it’ll try a username with each possible password before moving on to the next username.
Also it’s worth noting that payload lists can be modified before they’re sent, such as Base64ing payloads or URI encoding them. This is done under the Payloads menu in the “Payload Processing” box. Options include encoding, adding prefixes, adding suffixes, hashing, modifying case – all sorts!
There are two main windows for Intruder, the first is where you set up the requests and payload sets, and the second is where the results are show.
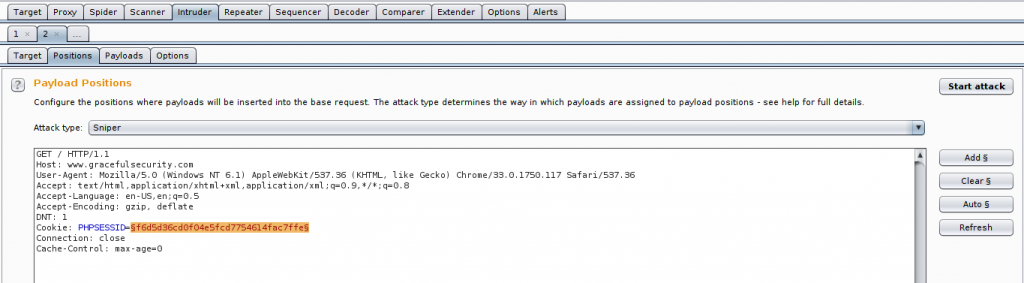
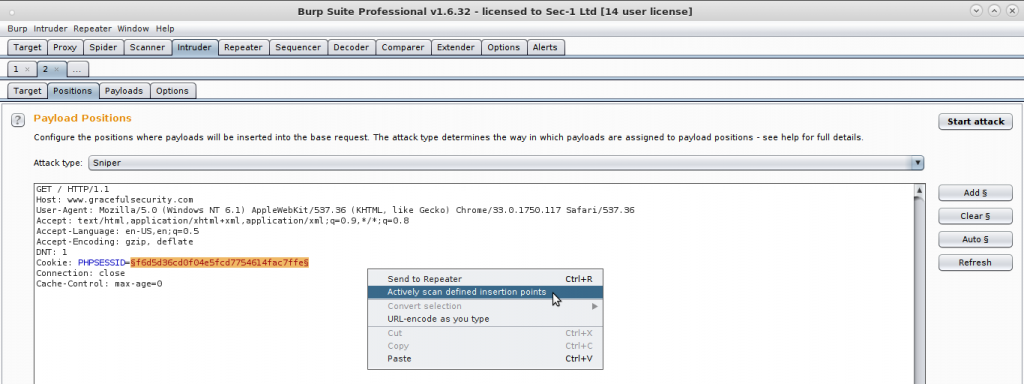
Intruder allows you to define insertion points, shown above in orange, You can specify multiple insertion points and either supply Intruder payload sets for manual fuzzing or perform an active scan of just the highlighted sections. The latter is good if you want to active scan an input but Burp doesn’t support the serialisation type (it supports XML and JSON for example, but if the application is using something custom you can help Burp parse it using Intruder and manual insertion points)!
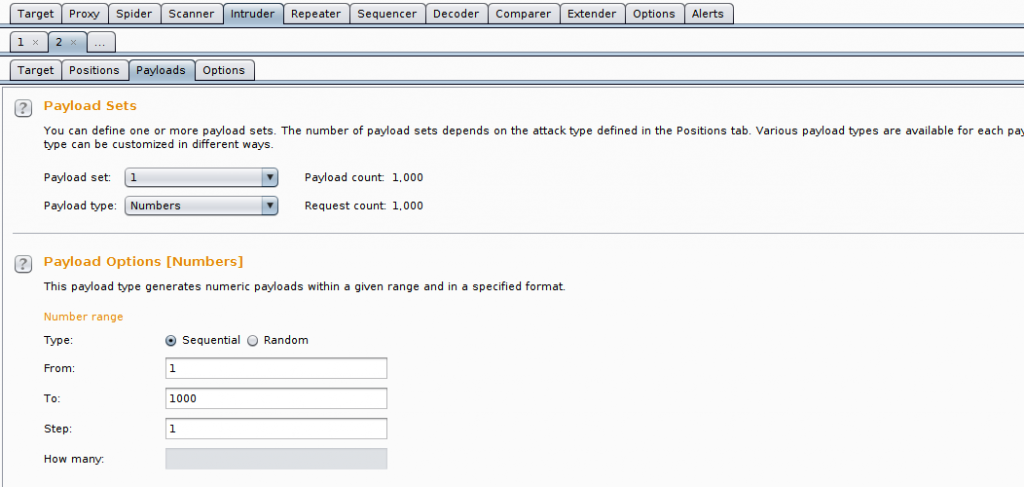
There are many types of payload set, such as simple lists, generated numbers of built in lists of things such as usernames and passwords!
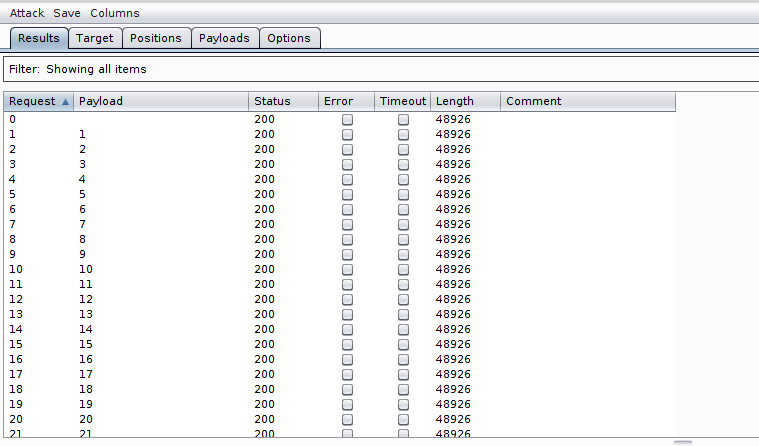
When you hit “Start Attack” Burp will send each request and show you all of the data that it can about each response, such as the response code, length and if an error occurred. You can expand on the items that are highlighted by giving Burp strings to match on (such as “Login Successful”) or by asking it to extract items automatically (such as a list of exposed usernames!
Scanner – Automation
The active scanner within Burp suite is incredibly simple to use, just capture a request and hit “Do active scan”. However there’s a trick that comes in handy, you can choose to active scan specific parameters (or parts therefore) instead of a whole request, by first sending the request to Intruder you can define insertion point much like you would if you were to use intruder payloads, but instead just right click and “Do Active Scan”.
Manually defining insertion points and then active scanning those is good if you want to scan a single input, if you want to exclude certain inputs or if Burp doesn’t understand the serialisation method used!
Scanner results from both the passive scanner and active scanner are then displayed on the target “Dashboard” page, including the relevant payloads and essentially the reason why burp thinks it’s a vulnerability.
Sequencer
Sequencer can be used to test the randomness of data within a web application, so usually we’d employ it to test how secure cookie are, if they’re being generated through an incrementing integer, if they’re running through a predictable pattern or if their PRNG is bad hopefully Sequencer will pick up on that. It’s pretty simple to use, you just give it the response that contains the item you’re wanting to assess (for example the Set-Cookie header) and tell it to start capturing! It’ll repeat the request several thousand times and test the randomness as it goes.
The following screenshot shows a request that contains a Set-Cookie header that has been sent to sequencer, it’ll automatically pull out common sequence-point such as cookies, form fields, etc.
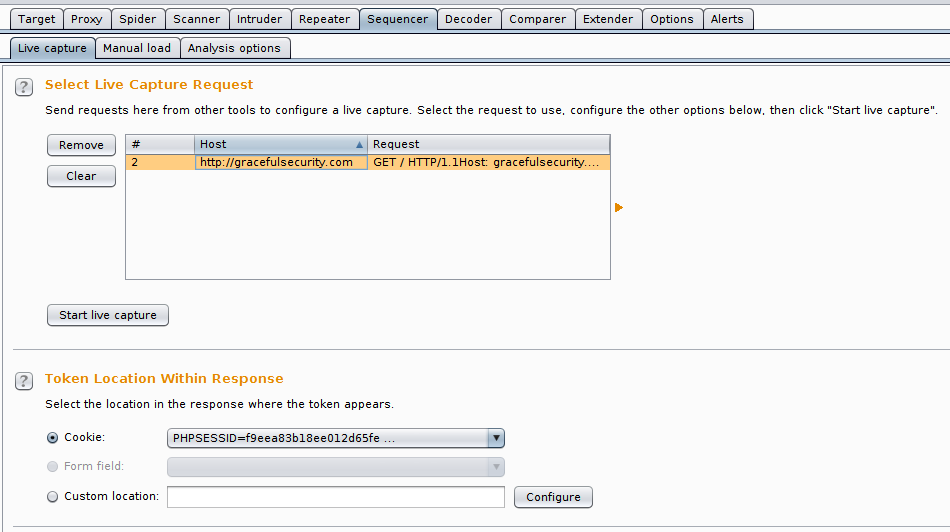
Sequences can test the randomness of any server output, but automatically picks up on things like cookies and form fields. If it’s something non-standard that you’re wanting to test then you can configure a custom location to show burp the item to extract and assess.
We can go ahead and hit “Start Live Capture” for it to repeat the (in this case, login) request and gather lots of items to test.
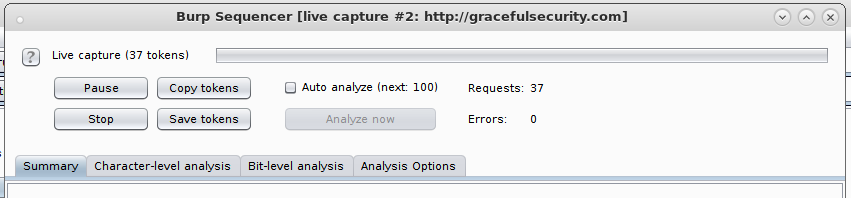
Burp will repeat the request many times until it has gathered enough tokens – for bit level tests you can assess after 100 tokens although for Character-level analysis you’ll need 20.000. Don’t forget that you can ask Burp to Base64 decode the tokens first before assessing them if you’d like and you can export the list of captured tokens for your records or to make additional changes to them before analysing them.
After enough cookies have been received it can test them for randomness, 20000 have to be captured for Character-level analysis but the output quite quickly shows how random an analysed item is and a large number of randomness tests are supported! All green is good, lots of red shows bad random.
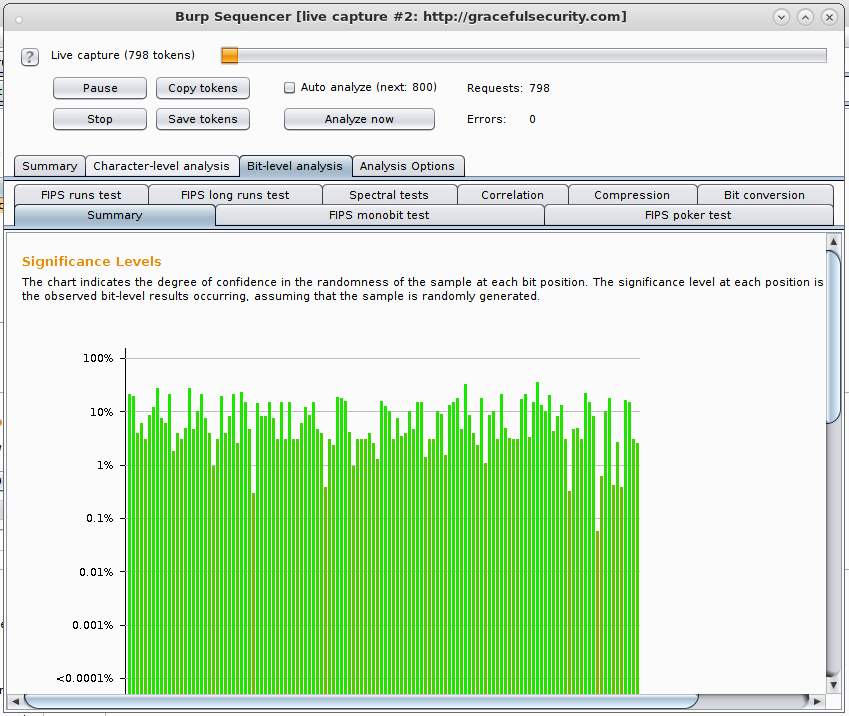
Each test has its own tab and graph output to keep things neat, plus if poor randomness is detected then you can scroll down in this window for an explanation of why Burp has flagged this bit/character.
Decoder
Decoder is a neat little added extra to Burp which comes in handy a surprising amount of the time, found some encoded data in a response and was to quickly know what it means? Highlight it, right click and select “send to Decoder”!
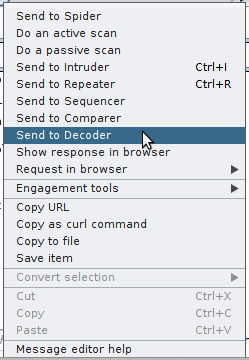
Many of the tabs allow you to “Send to Decoder” but I find that I use this option most frequently from either Intercept, Repeater or HTTP History. You can only have one item loaded into decoder at a time, but you can run multiple encodings on that item, such as hex encoding and then base64 encoding.
Once your data is in decoder you can select which encoding/decoding option you like, on the right:

Macros, Extender – The future
Burp Macros are great for repeating several requests at key moments, automatically. For example if during an active scan the web application logs you out as an automated protection mechanism then you can record a macro of the authentication process, show burp what it looks like when you’re logged out and tell it to auto-run the macro!
Macros definitely deserver their own post though, so I dive into them in detail here, using the above as an example: Burp Macros Example – Re-authentication
Extensions on the other hand allow you to build on the basis of Burp if you need t add a feature that just doesn’t exist, this could be adding new scanner payloads, tying burp into another tool such as SQLmap or even bypassing complex protective mechanisms in an automated way such as anti-CSRF tokens
Extensions can be written in Ruby, Java or Python (or more accurately Jython) and I’ve got a whole post on this topic with example code to get you started! Extensions Example – Burp vs CSRF Tokens
There are a whole host of Extensions already written though, and I’d certainly recommend taking a look at Logger++, WSDLer, and Additional Scanner Checks. These can all be installed within a couple of clicks from the built in “Apps Store”:
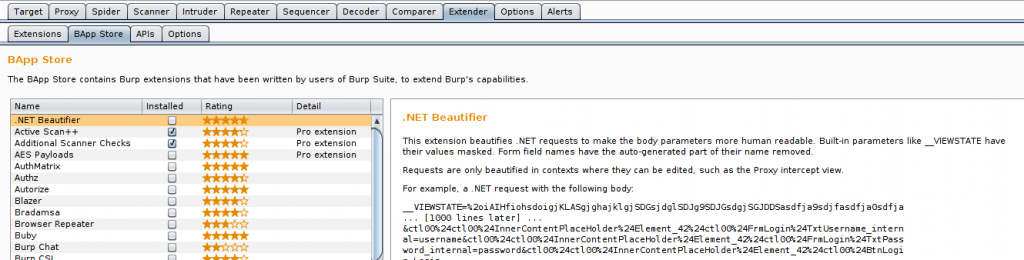
All of the items in the App store are free, but some items have dependencies such as the Jython standalone file, I’ve done a write up for how to install Jython to get you started!